Difference between revisions of "Windows XP"
| (15 intermediate revisions by the same user not shown) | |||
| Line 3: | Line 3: | ||
Please note that full administrator rights to your computer are required. | Please note that full administrator rights to your computer are required. | ||
| − | Preparation | + | === Preparation === |
1. Before using eduroam you need to install '''SecureW2 client''' | 1. Before using eduroam you need to install '''SecureW2 client''' | ||
| Line 9: | Line 9: | ||
2. Click on the link below to download the SecureW2 software. Run the installer and follow the prompts. | 2. Click on the link below to download the SecureW2 software. Run the installer and follow the prompts. | ||
| − | + | [[http://uqconnect.net/helpdesk/wireless/eduroam/windows-xp/SecureW2_312.exe|SecureW2 Client for Microsoft Windows XP]] | |
| − | Setting up the connection | + | === Setting up the connection === |
1. Open up your network connections by clicking '''Start > Control panel > Network connections''' | 1. Open up your network connections by clicking '''Start > Control panel > Network connections''' | ||
| Line 17: | Line 17: | ||
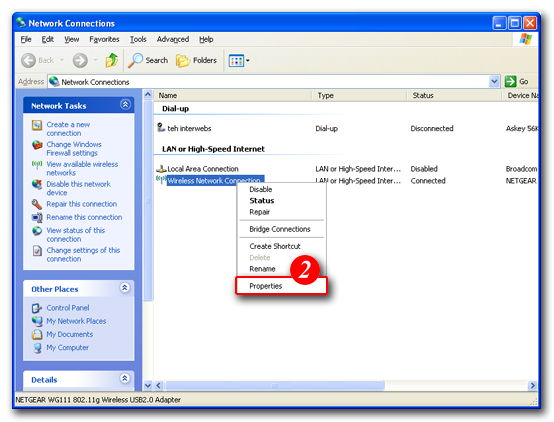
2. Right click on [Wireless Network connection] and click '''Properties''' | 2. Right click on [Wireless Network connection] and click '''Properties''' | ||
| − | [[File:Xp2.png]] | + | [[File:Xp2.png]] |
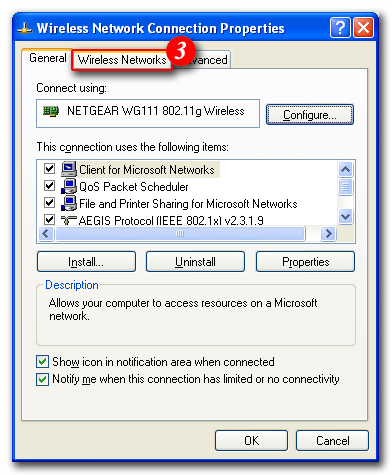
3. Click on '''Wireless Networks''' tab | 3. Click on '''Wireless Networks''' tab | ||
| − | [[File:Xp3.png]] | + | [[File:Xp3.png]] |
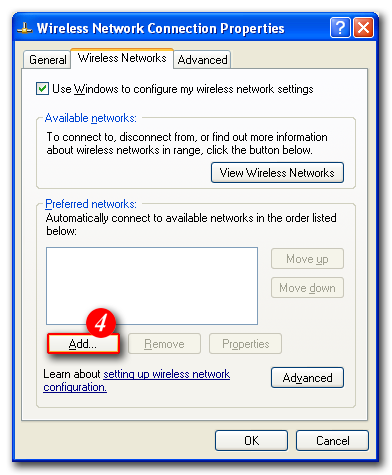
| − | 4. Click [Add ] | + | 4. Click '''[Add ]''' |
| + | [[File:Xp4.png]] | ||
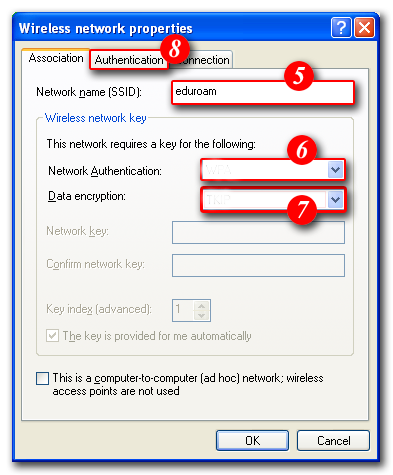
| + | 5. Add '''eduroam''' as the SSID | ||
| + | 6. Network Authentication: '''WPA2''' | ||
| + | 7. Data encryption: '''AES''' | ||
| + | 8. Click the '''Authentication''' tab | ||
| + | [[File:Xp8.png]] | ||
| + | 9. Set EAP type to '''SecureW2''' | ||
| + | [[File:Xp9.png]] | ||
| + | 10. Click '''Properties''' | ||
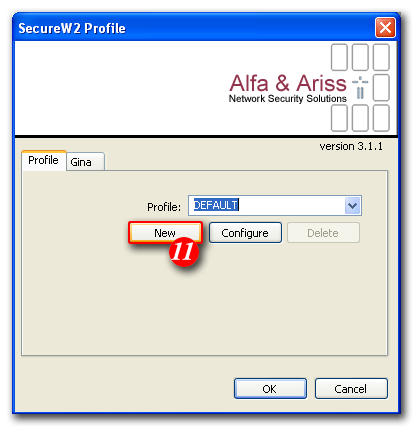
| + | 11. Click '''New''' | ||
| + | [[File:Xp11.png]] | ||
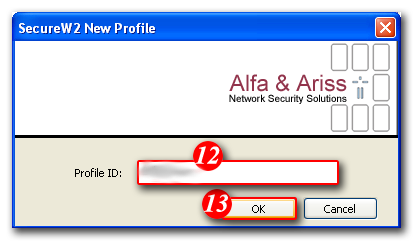
| + | 12. Enter '''eduroam''' as the Profile ID | ||
| + | 13. Click '''OK''' | ||
| + | [[File:Xp13.png]] | ||
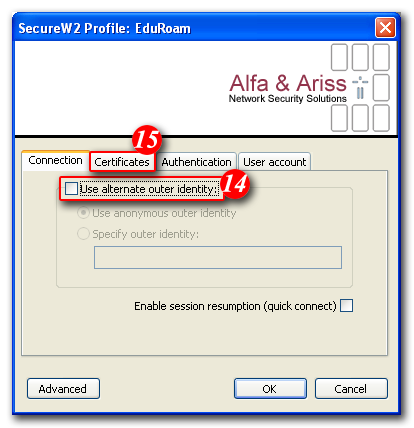
| + | 14. Ensure '''Use alternate outer identity''' is '''not''' ticked | ||
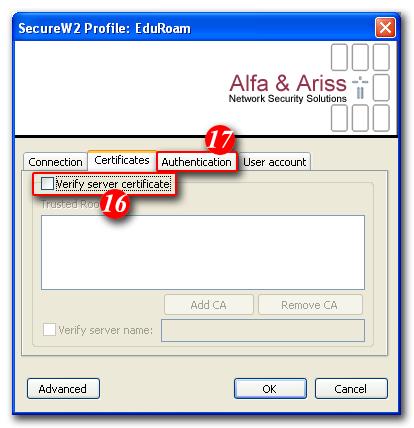
| + | 15. Click '''Certificates''' tab | ||
| + | [[File:Xp15.png]] | ||
| + | 16. Ensure '''Verify server certificates''' is '''not''' ticked | ||
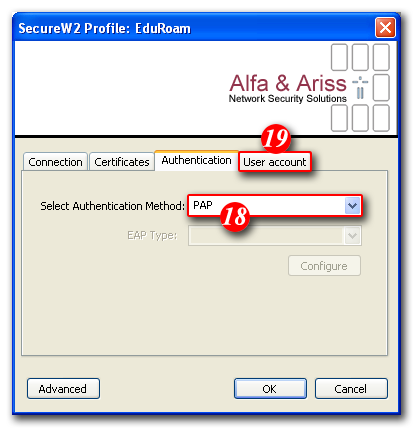
| + | 17. Click the '''Authentication''' tab | ||
| + | [[File:Xp17.png]] | ||
| + | 18. Select Authentication Method: '''PAP''' | ||
| − | + | 19. Click the '''User account''' tab | |
| − | |||
| − | |||
| − | |||
| + | [[File:Xp19.png]] | ||
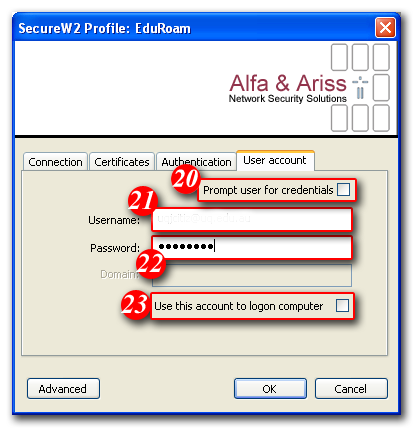
| + | 20. Ensure '''Prompt user for credentials''' is '''not''' ticked | ||
| + | 21. Enter your ''' ''username''@realm.or.ke '''(realm=your domain)''' | ||
| + | 22. Enter your '''password''' | ||
| + | 23. Ensure '''Use this account to logon computer''' is '''not''' ticked | ||
| + | 24. Click '''OK''' | ||
| + | [[File:Xp24.png]] | ||
| + | 25. Continue clicking ''' OK '''until you are back at '''Network Connections''' | ||
| + | === Connecting to eduroam === | ||
| + | 1. Right click on '''Wireless Network Connection''' and click on '''View Available Wireless Networks''' | ||
| + | [[File:Xp con1.png]] | ||
| + | 2. Select the '''eduroam''' network | ||
| + | [[File:Xp con2.png]] | ||
| − | + | 3. Click '''Connect''' | |
| − | |||
| − | |||
| − | |||
| − | |||
| − | |||
| − | |||
| − | |||
| − | |||
| − | |||
| − | |||
| − | |||
| − | |||
| − | |||
| − | |||
| − | |||
| − | |||
| − | |||
| − | |||
| − | |||
| − | |||
| − | |||
| − | |||
| − | |||
| − | |||
| − | |||
| − | |||
| − | |||
| − | |||
| − | |||
| − | |||
| − | |||
| − | |||
| − | |||
| − | |||
| − | |||
| − | |||
| − | |||
| − | |||
| − | |||
| − | |||
| − | |||
| − | |||
| − | |||
| − | |||
| − | |||
| − | |||
| − | |||
| − | |||
| − | |||
| − | |||
| − | |||
| − | |||
| − | |||
| − | |||
| − | |||
| − | |||
| − | |||
| − | |||
| − | |||
| − | |||
| − | |||
| − | |||
| − | |||
| − | |||
| − | |||
| − | |||
| − | |||
| − | |||
| − | |||
| − | |||
| − | |||
| − | |||
| − | |||
| − | |||
| − | |||
| − | |||
| − | |||
| − | |||
| − | |||
| − | |||
| − | |||
| − | |||
| − | |||
| − | |||
| − | |||
| − | |||
| − | |||
| − | |||
| − | |||
| − | |||
| − | |||
| − | |||
| − | |||
| − | |||
| − | |||
| − | |||
| − | |||
| − | |||
| − | |||
| − | |||
| − | |||
| − | |||
| − | |||
| − | |||
| − | |||
| − | |||
| − | |||
| − | |||
| − | |||
| − | |||
| − | |||
| − | |||
| − | |||
| − | |||
| − | |||
| − | |||
| − | |||
| − | |||
| − | |||
| − | |||
| − | |||
| − | |||
| − | |||
| − | |||
| − | |||
| − | |||
| − | |||
| − | |||
| − | |||
| − | |||
| − | |||
| − | |||
| − | |||
| − | |||
| − | |||
| − | |||
| − | |||
| − | |||
| − | |||
| − | |||
| − | |||
| − | |||
| − | |||
| − | |||
| − | |||
| − | |||
| − | |||
| − | |||
| − | |||
| − | |||
| − | |||
| − | |||
| − | |||
| − | |||
| − | |||
| − | |||
| − | |||
| − | |||
| − | |||
| − | |||
| − | |||
| − | |||
| − | |||
| − | |||
| − | |||
| − | |||
| − | |||
| − | |||
| − | |||
| − | |||
| − | |||
| − | |||
| − | |||
| − | |||
| − | |||
| − | |||
| − | |||
| − | |||
| − | |||
| − | |||
| − | |||
| − | |||
| − | |||
| − | |||
| − | |||
| − | |||
| − | |||
| − | |||
| − | |||
| − | |||
| − | |||
| − | |||
| − | |||
| − | |||
| − | |||
| − | |||
| − | |||
| − | |||
| − | |||
| − | |||
| − | |||
| − | |||
| − | |||
| − | |||
| − | |||
| − | |||
| − | |||
| − | |||
| − | |||
| − | |||
| − | |||
| − | |||
| − | |||
| − | |||
| − | |||
| − | |||
| − | |||
| − | |||
| − | |||
| − | |||
| − | |||
| − | |||
| − | |||
| − | |||
| − | |||
| − | |||
| − | |||
Latest revision as of 12:20, 5 September 2013
Connecting Windows XP to eduroam with an external supplicant
Please note that full administrator rights to your computer are required.
Preparation
1. Before using eduroam you need to install SecureW2 client
2. Click on the link below to download the SecureW2 software. Run the installer and follow the prompts.
[Client for Microsoft Windows XP]
Setting up the connection
1. Open up your network connections by clicking Start > Control panel > Network connections
2. Right click on [Wireless Network connection] and click Properties

3. Click on Wireless Networks tab

4. Click [Add ]

5. Add eduroam as the SSID
6. Network Authentication: WPA2
7. Data encryption: AES
8. Click the Authentication tab

9. Set EAP type to SecureW2
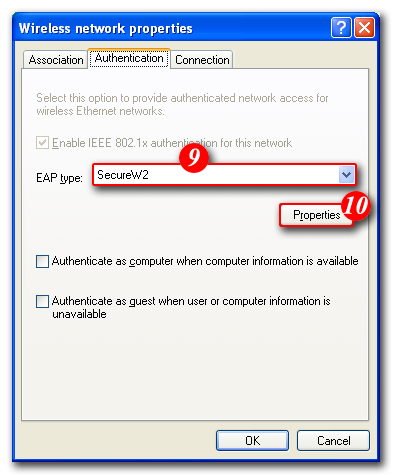

10. Click Properties
11. Click New

12. Enter eduroam as the Profile ID
13. Click OK

14. Ensure Use alternate outer identity is not ticked
15. Click Certificates tab

16. Ensure Verify server certificates is not ticked
17. Click the Authentication tab

18. Select Authentication Method: PAP
19. Click the User account tab

20. Ensure Prompt user for credentials is not ticked
21. Enter your username@realm.or.ke (realm=your domain)
22. Enter your password
23. Ensure Use this account to logon computer is not ticked
24. Click OK

25. Continue clicking OK until you are back at Network Connections
Connecting to eduroam
1. Right click on Wireless Network Connection and click on View Available Wireless Networks


2. Select the eduroam network
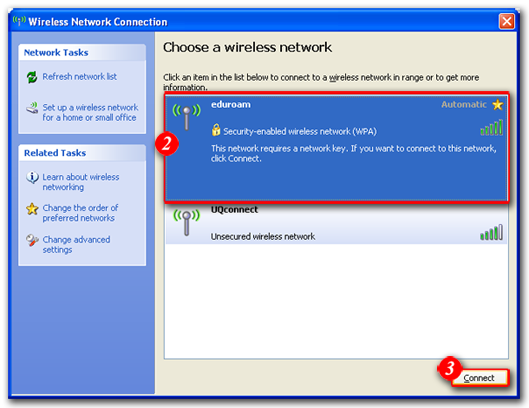

3. Click Connect