Difference between revisions of "Mac OS X 10.8 - Mountain Lion"
| (12 intermediate revisions by the same user not shown) | |||
| Line 15: | Line 15: | ||
Check that the '''AirPort''' connection is selected, then from the '''Network Name''' drop down box select eduroam | Check that the '''AirPort''' connection is selected, then from the '''Network Name''' drop down box select eduroam | ||
| − | [[File:Eduroam.png]] | + | [[File:Eduroam.png]] |
In the dialogue box that opens: | In the dialogue box that opens: | ||
| − | [[File:Opens.png]] | + | [[File:Opens.png]] |
| − | + | Enter your '''eduroam identifier''' (typically your ''username'' followed by ''@institutionrealm.ac.ke'') in the '''User Name''' box | |
| − | |||
| − | |||
| − | |||
| − | |||
| − | |||
| − | |||
| − | |||
| + | Enter your '''Password''' in the '''Password box''' | ||
| + | Leave '''802.1X''' as '''Automatic''' | ||
| + | '''Tick''' ''Remember this network'' if it not already ticked | ||
| + | Select '''OK''' | ||
| + | In the '''Verify Certificate''' dialogue box | ||
| + | select ''Continue'' | ||
| + | [[File:Continue.png]] | ||
| + | In the '''confirmation box''' that appears | ||
| + | [[File:Appears.png]] | ||
| + | Type your '''Mac OS ''' ''username'' and ''password'' (not the eduroam ones!) then select '''OK''' | ||
| + | If you started by opening the System Preferences (step i), you will be dropped back into the '''Network pane'''. | ||
| + | Now you need to set the trust settings for the server | ||
| + | |||
| + | Select '''Advanced''' | ||
| + | [[File:Advanced.png]] | ||
| + | Then choose the '''802.1X pane'''. Ensure the '''User Profile:''' ''eduroam'' option is '''highlighted''' (if the profile does not appear then restart your Mac and continue from here). | ||
| + | Make sure that only '''PEAP '''and '''TTLS''' are enabled (uncheck anything else) and then select '''Configure''' | ||
| − | + | [[File:Configure.png]] | |
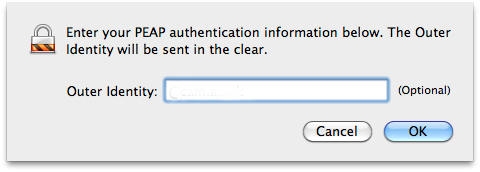
| − | |||
| + | Set the '''outer identity''' identity to ''@realm.ac.ke '' | ||
| + | then select OK to close the pane | ||
| + | [[File:Pane.png]] | ||
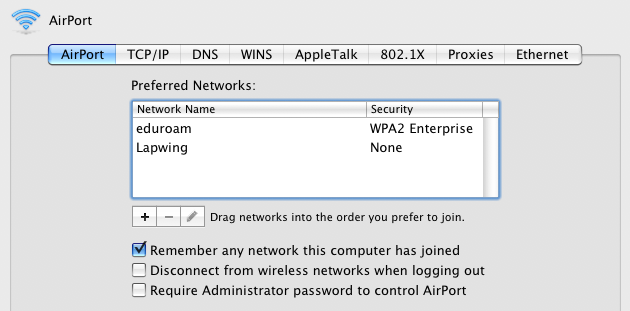
| − | + | In order to ''automatically'' connect to eduroam you need to have this set as your preferred network; to do this choose the '''AirPort pane''' and drag eduroam to the top of the '''Preferred Networks list''' | |
| − | |||
| − | + | then select Apply and then select OK to close the '''Advanced pane''' | |
| − | + | [[File:Advance pane.png]] | |
| − | |||
| − | |||
| + | You can now see that you are connected and authenticated | ||
| − | + | [[File:Steps.png]] | |
| − | + | Select '''Apply''' to save the changes and close the window. | |
| − | |||
Your computer will now be authenticated to the network, after that you should be able to access the internet. If you get an error saying that authentication has failed, double-check the above steps. | Your computer will now be authenticated to the network, after that you should be able to access the internet. If you get an error saying that authentication has failed, double-check the above steps. | ||
| − | All the settings you have made are stored in your computer and should not need re-entering each time you connect to the eduroam network. | + | |
| + | '''All the settings you have made are stored in your computer and should not need re-entering each time you connect to the eduroam network.''' | ||
Latest revision as of 11:32, 8 September 2013
Configuration steps
Make sure that you have your credentials (eduroam identifier and Network access token (username and password)) from your Network Administrator.
To get the list of networks
Either select eduroam from the AirPort dropdown in the menu bar (you may need to select Turn AirPort On first) Or:-
i. Open System Preferences
ii. From Internet & Wireless, select Network
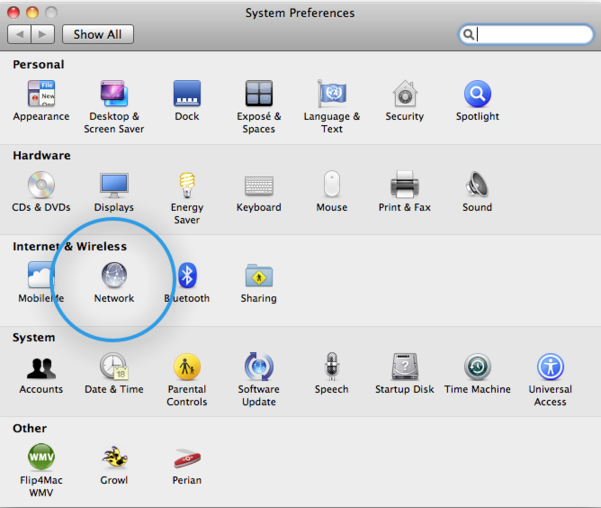

Check that the AirPort connection is selected, then from the Network Name drop down box select eduroam


In the dialogue box that opens:


Enter your eduroam identifier (typically your username followed by @institutionrealm.ac.ke) in the User Name box
Enter your Password in the Password box
Leave 802.1X as Automatic
Tick Remember this network if it not already ticked
Select OK
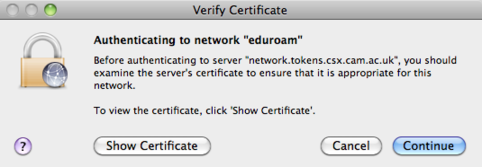
In the Verify Certificate dialogue box
select Continue

In the confirmation box that appears


Type your Mac OS username and password (not the eduroam ones!) then select OK
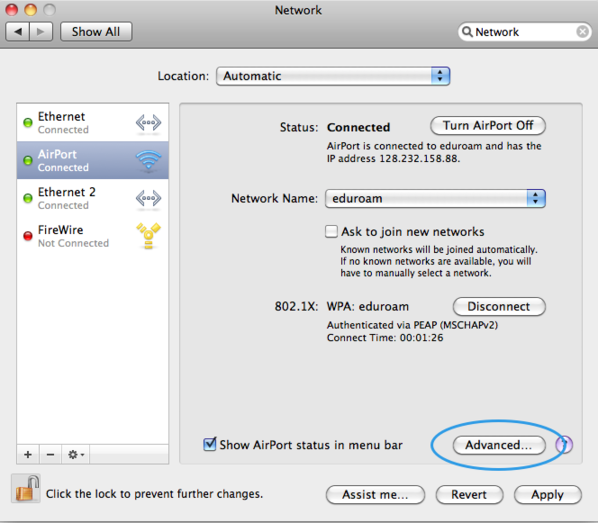
If you started by opening the System Preferences (step i), you will be dropped back into the Network pane.
Now you need to set the trust settings for the server
Select Advanced

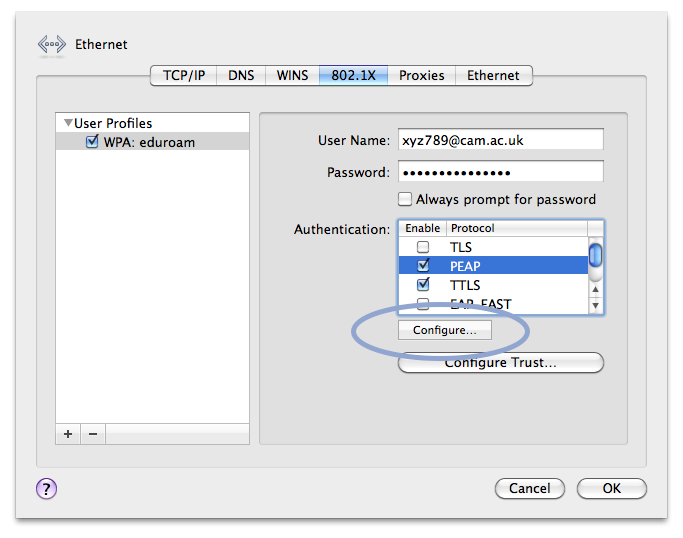
Then choose the 802.1X pane. Ensure the User Profile: eduroam option is highlighted (if the profile does not appear then restart your Mac and continue from here).
Make sure that only PEAP and TTLS are enabled (uncheck anything else) and then select Configure

Set the outer identity identity to @realm.ac.ke
then select OK to close the pane

In order to automatically connect to eduroam you need to have this set as your preferred network; to do this choose the AirPort pane and drag eduroam to the top of the Preferred Networks list
then select Apply and then select OK to close the Advanced pane

You can now see that you are connected and authenticated


Select Apply to save the changes and close the window.
Your computer will now be authenticated to the network, after that you should be able to access the internet. If you get an error saying that authentication has failed, double-check the above steps.
All the settings you have made are stored in your computer and should not need re-entering each time you connect to the eduroam network.